Avast ye, keep a weathered eye out! Batten down the hatches! Beware the Jolly Roger, thar be pirates on the horizon…
Wait a moment… it’s just a miniature pirate. And it’s trapped inside a bottle. I think we are safe after all.
Today’s project is a mixed media 3×3″ canvas. You can find canvases at your local craft store. I’m partial to the 3×3″ size. There’s just something about a miniature canvas. There’s no pressure to cover a giant canvas with lots of stuff. Instead, you are challenged with keeping things to a minimum to avoid too much clutter.
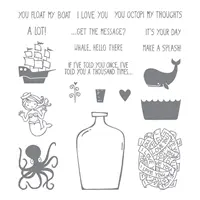
The bottle image from the Message In A Bottle stamp set is perfectly sized for this project. I love that the stamp set has a variety of things that you can put in your bottle. And a variety of sayings to go with the different objects.  To make the canvas…
- Start by stamping and cutting out the various pieces. The sails for the ship are colored in using an aqua painter and Soft Suede ink. I used the Black Staz On to stamp the bottle on a Window sheet. The Staz On is permanent and won’t smear. To cut out the teeny waves inside the bottle, I used my 1/8th hand held punch and just punched along the top edge. It is the perfect size for those little waves.
- Glue the ship to the back of the little waves. Using your fine-tip glue, glue only the bottom of the bottle to the bottom of the waves inside the bottle. Be careful to not use a lot of glue and keep to the very bottom of the waves. The glue will make the ink for the waves smear slightly. Don’t worry too much about the smeared ink, you can cover it with the paste. Set aside to dry.
- Sponge the canvas with Soft Sky reinker.
- Glue the ship and bottle to the canvas using fine-tip glue. I used a small amount of fine-tip glue on the back side of the top of the bottle to adhere the bottle top to the canvas. The top really needs to be glued down too, otherwise it hangs forward slightly. Set aside to dry.
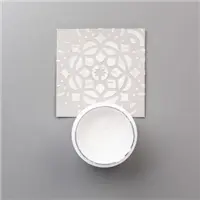
- Using the scallop border from the Seasonal Layers Framelits, die cut a piece of card stock. This will be your mask to make the waves.
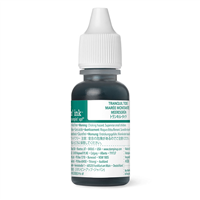
- Put a bit of embossing paste on your silicone mat, mix in a drop or two of Tranquil Tide reinker. The more reinker you add, the darker your embossing paste will be.
- Once the bottle is glued to the canvas, lay your scallop stencil across the bottom fourth of the canvas. Adjust the stencil for placement so it looks like the bottle is floating just at the surface of the waves.
- Hold the stencil in place and smear on the embossing paste with your palette knife getting a fairly even coat. Make sure you get the paste into the tips of the scallop so the waves look more realistic.
- When you’re happy with the amount of paste, remove the scallop stencil and toss. You can’t reuse this stencil since it’s cardstock. Set aside to dry.
- Cut apart the “you float my boat”. Use fine-tip glue to adhere each word to the canvas.
 I am so happy with how this project turned out. These mini canvases are such a fun size to work with. And I am in love with our brand new embossing paste. I love the dimension it gives to projects.
The embossing paste does have a couple quirks. It dries very quickly. This is great for your project, but not so much when it comes to clean up. As I mentioned, I made my stencil out of card stock because I knew I was going to toss it. If I’d made it out of a window sheet, I would have needed to clean it immediately after applying the paste to the canvas. You can’t let the paste dry on the stencil. It takes a ton of scrubbing to get it off once it’s dried – ask me how I know.
A small bit of paste goes a long way. If you’re just using it in white, you can use it straight out of the jar. If you are coloring it, you’ll want to put a small amount on your silicone craft sheet to work with. You can always add in more paste if you need to. Don’t put reinker in your big jar of paste, unless you want an entire jar of that one color. If you ended up with too much colored paste, you could try to save it in another jar. Or you can toss the remaining bit. It’s up to you. Once you’ve done a few of these types of projects, you’ll get a better feel for how far the paste goes. You’ll end up with less and less left over each time.
It is the last week of July and these specials will be ending very soon. Don’t miss them! Free craft supplies are always a good idea.

For every $50 (pre-tax/shipping) you spend from now until July 31, you’ll get a $5 Bonus Days coupon that you can use in August. There is no limit to how many coupons you can earn. Spend $100, get two coupons. Spend $150, get three coupons and Host Benefits too!
 Or you can do what I do and become a Demonstrator. Purchase your Starter Kit by July 31 and you will receive a FREE Essentials Gift Pack valued at $52. And Stampin Up is also including the Carols of Christmas Stamp Set which isn’t even available yet for FREE ($20 Value)! Oh my goodness! That’s $72 worth of FREE goodies, just for signing up. The Starter Kit costs $99 (including shipping), and with this promo, you will get a total of $197 in products for only $99. Wow! That’s like getting all those goodies for half price. Sign up now and join my team.


Leave a Reply